Well, 123D Catch is finally available on a platform that I can test. The release late last week of the free app for the iPhone took the product from news sensation to actual toy for me, and I can now give you some preliminary results.
 Previously, it was available for my iPad, as well, but for some reason I could never successfully download and test it (it may have had something to do with me not upgrading to iOS5 on the iPad before I tried it – it’s unclear). And there was a desktop version for PC, but that really wasn’t happening. I don’t even know how to work a PC anymore.
The app for the iPhone, though? Yeah, that’s pretty easy to work.
First, you simply search the App Store, which delivers exactly one result. You click on that and get the free download installed to the iPhone within about 30 seconds if you’re in a wifi environment (and, really, I’d recommend being in a wifi environment whenever you’re doing anything with 123D Catch, though it does work okay in 3G if you’ve got a strong signal).
Then, when you fire it up, there’s an immediate tutorial you have to watch before you can even play with it. And, each step of the way, you’re forced to either watch a short video or scroll through a slide show explaining how to accomplish the next step.
Here’s the basic gist of it, though:
1. Click the “New Capture” button.
2. Take up to 40 pictures of any object from a variety of different angles, making sure to have images that overlap each other at least a little (this is not hard).
3. Review the pictures you’ve taken and eliminate any that are especially bad (this can happen because the shutter button isn’t always entirely responsive).
4. Upload the photos to the Autodesk 123D cloud. This takes about five minutes, depending on whether you used up all 40 photos or not.
5. Check out the model you’ve created.
At this point you can check out your model on your phone, playing around with it, taking screen grabs and emailing the model to your friends (who will need to also have the app on their phones to actually look at it).
But, and this is more fun and interesting, you can also click “share to community” and then go check out your model at your free account (mine is linked to my SPAR_Editor Twitter account) at 123dapp.com in “My Corner.” There, you can make your model public and let other people play around with it and they can even download .stl file for “fabrication” (none of my models is even close to water tight), a “mesh package file” (with an .obj, an .mtl, a .jpg, and a .png), or a zipped folder of all the photos you used to create the model in the first place.
This is my 123dapp profile if you want to check out my sample models. I’ll talk about how I got my results down below.
Playing with the models on the phone is a blast. As you tip the phone, there’s a “gyroscope” mode so that the model tips with your phone. If you find that annoying, you can turn that off and just manipulate with you fingers, making it bigger and smaller and rotating, etc. Great way to impress friends, really, and the kids love it.
Further, you can do all of that online as well, on that 123dapp site, and you can play with other people’s models in the same way (all as long as you’ve got a modern browser – Firefox, Safari, or Chrome all worked for me). And having that export option actually makes them useful – you can bring them into something like blender or what have you and be able to have a starting point, whether you’re trying to make a 3D animation or a printable object. The workflow is very simple.
The only disappointment in the 123dapp site is that you’re not given an embed code to embed your models in other sites.
However, you can download that .stl file and then upload that to Sketchfab and, voila, you’ve got something you can embed. Unfortunately, you don’t get the imagery layered on, so you just have a suface mesh, no texture. Still, it’s pretty cool, and you can do a pretty good job of evaluating how good the app is by looking at them.
So, let’s look at my intial testing and the results I got.
As soon as I downloaded the app, I headed to downtown Portland and Monument Square (mostly because I was hungry, but that’s another matter). In the middle of the square is the Lady Victory statue, one of my favorite in the city. Here’s how the capture came out:
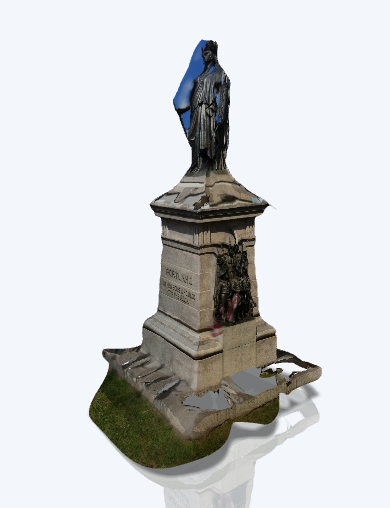
I was pretty pleased. But that’s the good side I’m showing you. Here’s the mesh for you to play around with, and you’ll see the app’s (and photogrammetry’s) limitations:
Notice how one side looks great, but the other is all lumpy and formless? That’s because on one side I was shooting photos with the sun at my back, and the images came out crystal clear, while on the other side the sun was in my face and everything got washed out. That’s the peril of shooting outside. (It should also be noted that I’m using an iPhone 4. I believe the 4S would get better results, as the camera is far superior – my wife has one, and her photos destroy mine side to side.)
This app is not going to replace in any significant way archaeological documentation workflows, that’s for sure, unless it’s always cloudy and they get much better results from their iPhone camera than I do.
Next up, I thought I’d try something I could get the top of and see if a more contained object would show up better. So, I tried one of the local free newspaper boxes. Unfortunately, for a reason I can’t quite figure, it came out upside down. Like so:
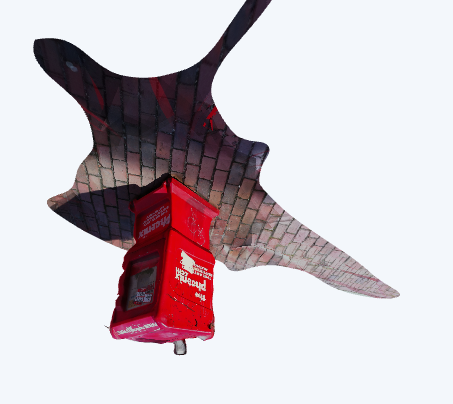
Looks pretty sharp, actually, though the mesh file was a little disappointing, with a huge hole in one side. Still, the bricks look great!
Finally, I thought I’d try a discreet object, with lots of variation on a surface with an identifiable grid. Namely, the 67 Mustang toy I keep in my office, placed on a yoga mat. I worked out pretty cool. Here’s the export from my phone (it’s lower res than the other screen captures above, but I wanted to show you what it looked like:
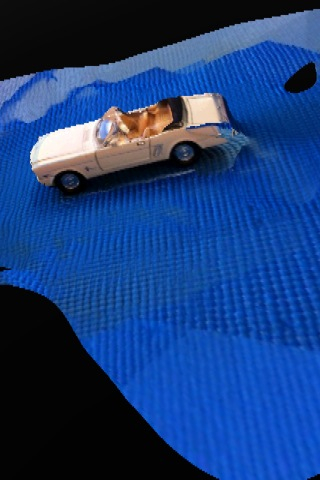
It definitely came out pretty nicely, but we lost a lot of the windshield, and I was disappointed with the way the back driver’s side corner got all caught up with the yoga mat. Probably the most fun of the models to play with, though:
I’m not sure why all of those mountains in the mat popped up. It was lying flat. Maybe something about the grid confused the algorithm?
Regardless, I’m sure with some practice I can get some better results, but the initial feedback is probably pretty accurate to the app’s limitations. This is not in any way a commercial tool. Nor, of course, was it intended to be. But, as a way to get the imagination racing with 3D modeling, it’s pretty great. Most people I’ve shown this to, even when I’ve shown them what’s on Sketchfab, have been pretty blown away that it’s even possible.
That’s worth something. To know that the limits of possibility have been pushed is an important thing. If that’s possible, what else might we be able to do? The answer to that question is the seed of valuable innovation.


