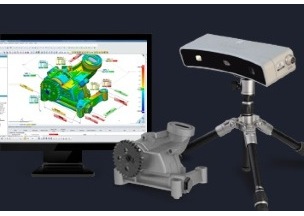
I recently had a chance to perform some tests with the new Geomoagic Capture scanner and the associated Geomagic Wrap software package with Domenick Alario from our SmartGeoMetrics office in Washington DC. The Capture is a blue light LED scanner that is designed primarily for the rapid-prototyping and 3D printing market. The unit’s specifications sheet lists accuracy results that range from 60µm at 0.3m to 118µm at 0.5m. As you can note from the previous sentence, the scanning field of view is rather small but it is certainly in line with other scanners in this accuracy range. The estimated price varies between $18,000-30,000 USD (retail) depending upon the software bundle. The scanner can be bundled with the plugins necessary for export to other applications, or it can be bundled with processing applications (Verify or Control), which are the new Geomagic brandings of the Rapidform titles acquired by 3D Systems.
Scanning with the Capture is straightforward and quick. Each scan takes 20-30 seconds and collects up to 985,000 points. The Capture sets up on a small camera tripod and connects to your computer via a single cable that splits into an Ethernet connector and an AC power cable. Having to connect it to a computer is kind of a pain, but the software is lightweight enough to be used on a laptop, which greatly increases the usability.
The scanning is controlled by the Geomagic Wrap software. The GUI is nicely rendered, with clear tabs and buttons along the top of the screen. These buttons are sequenced according to the order you’d use them in, with commands like, “Connect”, “Capture,” and “Scan.” Users have several options, including settings for HDR, exposure, level of detail, and target/alignment.
When you are scanning, you get a dialogue box with settings and a preview image of the captured data. Essentially, if you can’t see it in the preview box, then it is underexposed and will not be in the scan data. Overexposed areas are shown in red. However, overexposing the area did not seem to have any negative impact on the quality of the data.
When the Capture is set to scan, it emits a visible gridded light pattern across the scan field of view, which is handy for securing the best placement of the object to be scanned. The best-practice recommendation is to scan from 1ft. (0.3m) above and 1ft. (0.3m) away from your object. Essentially: Scan the object, rotate the object 15°-30°, scan again, then repeat until you have full coverage. Overall, the learning curve for scanning with the Capture is very short. Most of the work involves tweaking the exposure of each scan. Our experience seemed to indicate that, when in doubt, you should overexpose.
Registration is handled in an automated cloud-to-cloud manner by Geomagic Wrap, but you can also use target dots as you would when scanning with a hand scanner like one of the Creaform Handyscans. If you have a misalignment, you can easily add manual constraints to pull the clouds together. Continuing the theme of ease of use, Geomagic has included some Auto-Fix Model Tools that work very well for cleaning up the registered data. Wrap also includes some mesh cleaning tools for clean-up and filling holes, and allows you to save to various formats.
As with most scanners of this type, success is much easier to achieve with objects that have a flat color and a matte finish that are consistent across the whole surface. The shape of the object also defines the registration needs. As expected, objects without geometric eccentricities (spheres, cylinders, etc.) will require additional targets for a tight registration. We also found that placing the object on a black surface helped a lot, as you could increase the exposure without blowing out the data of the surface upon which the object is resting.
In conclusion, this is a great kit if you are looking for this type of short range/high accuracy scanning. While it’s not fully automated, it is closer to full automation than most other kits. The Wrap software package can also be used with data from other scanners. It is essentially the Rapidform XOV with a few twists and turns. Because it’s a Geomagic product, it dumps directly into Geomagic Control and Geomagic Verify, which you can use for additional processing tools, but it also plays well with others. In fact, there are plugins for direct export to Design X, Design Direct, SolidWorks, and Space Claim.
But the ease of use is probably the best selling point. In order to test the quality of the data, we worked with Mason3d LLC to print a beer stein that we scanned. From unboxing to Mason3d printing, our project took less than eight hours, and that includes a one-hour tutorial from Geomagic. I think that’s pretty good considering we had never used a Geomagic scanner before, are not Geomagic experts, and tried every variable and command in the software!
Again, many thanks to Domenick and Mason3D for their assistance with the review. If you have any questions feel free to post them in the comments and we’ll do our best to address them!